Video Transcript
0:00Hi guys! It’s Cath.
0:01Today I’m going to show you how to build
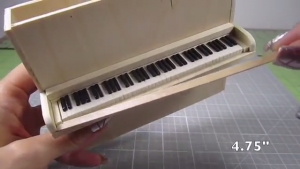
0:02this gorgeous 1:12 scale miniature upright piano.
0:05Thanks to everyone who requested this video because I had a lot of fun making it!
0:09Let’s get started.
0:10The first thing I do is grab a sheet of craft plywood.
0:12This is only 1/8 of an inch thick so I can cut it with just my X-acto knife.
0:15Draw out 4.75 inch by 4 inch rectangle.
0:18Then cut on the lines you drew on both sides and snap the wood off.
0:22This will be the front of the piano.
0:24Make 2 of these. These 2 pieces will be the front and back of the piano.
0:27Then cut out two 4 inch by 1 inch pieces using that same method.
0:32These two rectangles will form the sides of the piano.
0:34For the bottom, we need a ¾ inch by 4.75 inch thin rectangle.
0:38So in summary, we have the front and back pieces
0:40the sides pieces
0:42and the bottom.
0:43Let’s assemble them.
0:44Simply add wood glue to the bottom edge of the back piece
0:47and position it at a 90 degree angle to the base.
0:51Do the same for the front piece.
0:56Now just glue on the sides. As usual, I just use Elmer’s wood glue.
1:00This looks good for now, we’ll add on a top piece later.
1:03Now, let’s get to the fun part of making the piano keyboard.
1:05Cut out a 5 inch by 1 inch thin rectangle and glue it
1:08to the front piece 2 inches away from the bottom.
1:10This is what the keyboard will actually sit on.
1:12Let’s make the sides of this keyboard area next.
1:14I take a jumbo popsicle stick and because it’s thin, I double it up.
1:17Simply apply wood glue and add another popsicle stick.
1:20You can also just use more plywood here if you don’t have these popsicle sticks.
1:24Once that’s dry, I cut out a 1 inch piece.
1:26I just use a miter handsaw here to get a nice straight cut.
1:28This gives us a ¾ inch by 1 inch rectangle.
1:31Then draw a line down the middle of the long side and split that piece in half.
1:36Use a file to round out one corner.
1:39Do this to both pieces.
1:41Then glue each piece on either sides of the keyboard.
1:47Next, I grab a ¼ inch square dowel.
1:51Cut out a 4.75 inch length.
1:53Make two of these.
1:55Glue one to the back of the keyboard area.
1:58Add the second one right on top of it.
2:01Then take a craft matchstick. They’re like super tiny square dowels.
2:04Cut out two 5/8 inch pieces.
2:08Glue these to both sides of the inside keyboard area.
2:13Looks good- let’s put this whole thing aside for now and make the actual keys.
2:16For the keys, I use some white polymer clay.
2:19This stuff takes some work to get it soft so be patient.
2:22Once it’s soft, roll out a tube.
2:24Place 2 pieces of the plywood on either side and roll the clay out.
2:27The wood will ensure that the whole piece is rolled out evenly.
2:30You can use anything to roll this clay out. I just use this can.
2:37Then cut off the ends with flat knife.
2:39You want the length of this keyboard to be 4.5 inches long.
2:42Then take your knife and make indentations in the clay every 1/10 of an inch.
2:46They don’t need to be too deep but you want to make sure they’re clearly visible.
2:49Then use a ruler to help make a clean straight cut along the long sides.
2:52The keys should exactly half an inch.
2:54Therefore, the complete size of this polymer clay rectangle is half an inch by 4.5 inches.
2:59Remove the excess clay.
3:01Then use a knife to add the key details to the thin side of the keyboard.
3:04This will add really nice detail when you’re viewing the piano from the front.
3:07Bake it for 15 minutes at 275 degrees Fahrenheit.
3:10While that’s baking, let’s make the black keys.
3:12Roll out some black polymer clay.
3:14Here, I use popsicle sticks on the sides of the clay so get a thinner piece.
3:19Cut off the long sides to get a 3/8 of an inch in width.
3:22Then cut out a ton of 1/10 of an inch pieces.
3:29Pre-bake them for about 5 minutes.
3:31Once they’ve cooled down, break off the individual keys.
3:38To attach these black keys to the white ones, I’m using some liquid polymer clay.
3:42I just add a drop to the back of each black key and place it on the keyboard lines we created.
3:46Make groups of two and three alternating between group.
3:54Once you’ve placed all the pieces on, bake the entire keyboard again
3:57for 5-10 minutes to harden the liquid clay.
4:00To add some gloss, I’ll be using some Diamond Glaze.
4:03I just use a paintbrush to apply it.
4:06Look how much better these keys look with a coat of gloss.
4:10Look- I made a tiny pendant using these same exact steps.
4:13Okay, back to the piano.
4:14Add some glue to the keyboard area of the piano and attach the keys.
4:20Then grab a wooden coffee stirrer and cut out a 5 inch length.
4:23Glue it to the front of the keyboard base.
4:25Cut out another one that’s 4.75 inches long and glue to the front of the keys.
4:29This just gives the area a cleaner look.
4:31For the keyboard lid, cut out a rectangle that’s 4.75inch by 5/8 inch.
4:36This should fit snugly into place above the keys.
4:40Then grab some miniature hinges.
4:42The link to the ones I use is listed in the description box below.
4:45I just add a drop of super glue to the back of the hinges and attach them to the piano.
4:54Now your piano can open and close.
4:57To finish off the lid, I cut a 4.75 inch of coffee stirrer and glue it to the front edge of the lid.
5:03Now you have a really snug closure.
5:05Next, let’s build the legs of the piano.
5:07I cut out two 1 inch lengths from more 1/4 inch square dowels.
5:10Glue one to each side of the piano base.
5:15Then grab a ¼ inch round dowel.
5:19Use the miter saw to cut out two 1.75 inch lengths.
5:23File one end until you get a nice taper.
5:28Do this to both legs.
5:31Add wood glue and position them in place.
5:39We’re almost there guys.
5:41To close the top of the piano, cut out 5.25 inch by 1.25 inch rectangle.
5:45Round out one of the longer sides.
5:51Then glue it to the top of the piano.
5:57This next part is optional but I’m going to add some trim detail.
5:59Cut out two 5 inch lengths of coffee stirrer and glue them to the front of the piano.
6:03This will frame out this area.
6:05Add two more 1.25 inch pieces to finish the frame.
6:12Do the same of for the bottom.
6:15For the foot pedals, I grab a coffee stirrer with rounded ends.
6:18Break it in half and cut off the round ends at the half inch mark.
6:25Draw a straight line halfway down and curve it out to one side.
6:28Cut of the excess.
6:29Use a file to smooth out any rough edges.
6:31Do this for both foot pedals and glue them onto the piano using some wood glue.
6:34Make sure they’re positioned on the trim detail.
6:39Okay, final detail here
6:40I just cut out a 2 inch length from a coffee stirrer and glue it to the inside of the lid.
6:44Now we’re all finished with the build!
6:46Let’s get to the fun part of painting it. I’ll be painting this a nice classic black.
6:50Add black acrylic paint to all the bare wood areas.
6:52Use masking tape around the keyboard for a clean paintjob.
6:55About 2 coats should be enough to cover the wood completely.
6:58You can leave the hinges as is but I find them a bit too big.
7:01So I use some black nail polish to camouflage most of it.
7:03I use nail polish because acrylic paint does not stick well to metal.
7:06Paint the foot pedals with metallic gold acrylic paint.
7:12This looks pretty good already
7:13but as usual- I’m going to add on a few coats of polyacylic for a glossy look.
7:24As you can see, this varnish picks up the grain texture from the wood so several coats are necessary.
7:28To help ensure you get a smooth finish, use some high grit sandpaper between coats of poly.
7:35I could sand and add a few more coats here but I’m pretty satisfied with this finish.
7:39And that’s it guys! The miniature piano is all done.
7:41This would look great in any dollhouse setting or as a gift to a music lover in your life.
7:45I hope you liked this video- if you did, make sure to give it a thumbs up.
Video Transcript
0:00Hi guys! It’s Cath! Today, I’m going to show you how to make these super cute and
0:03realistic looking miniature acoustic guitars. They’re made up of mainly popsicle sticks
0:07so this is a project anyone can do! I’m showing how to make them in 1/12 scale standard
0:11dollhouse size but you can use the same exact steps and adjust the size to your liking.
0:15Now this is a pretty in depth video so let’s not waste time and jump right into it.
0:19The first thing we need to do is draw the template.
0:21I grab a sheet of graph paper and draw a 1.5 inch by 1.75 inch rectangle.
0:25I know I wrote 6 here but I really mean 1.5 inches.
0:29Here, I’m showing you the length of guitar neck
0:31which will extend 1.75 inches past the body.
0:34Draw 2 lines straight through the middle of the rectangle as guidelines.
0:38I draw the shape of the guitar body starting from the top of the vertical line
0:41and curving it out and down to one side.
0:43Curve it back in and out again making sure the bottom
0:46half of the guitar body is wider than the top.
0:48Make adjustments until you like the shape.
0:50You don’t need to draw anything else for the template (you’re done there)
0:52but I’m showing you how the neck will look
0:54and where the soundhole will be.
0:56As reference, the center of the hole will be half an inch from the top of the body.
0:59Cut out the body. We’ll use this template to cut the front and back pieces for guitar.
1:04Grab a jumbo popsicle stick and split it in half. Then glue them together to create a
1:08wide panel. Trace around the template and cut off the excess wood.
1:16Make 2 of these. One for the front and one for the back.
1:18Sand them to smooth out any rough edges.
1:20Then draw that soundhole onto one of the pieces and cut it out.
1:26To sand the inside of the hole, I like to roll
1:28some sandpaper around a dowel and just use that.
1:31For the sides of the body, I’m using some wooden coffee stirrers.
1:34I boil a pot of water and soak them in there for a few hours.
1:37You just need one stick for a guitar but I made extras just in case.
1:40You’ll love what we do with these.
1:42While that’s boiling, let’s get started on the neck.
1:43Using a regular popsicle stick, I first cut a curve onto one end.
1:47Then I mark the width of the widest part of the neck which is a quarter of an inch.
1:51Make a mark at 2.25 inch length area.
1:54Draw 2 vertical lines that gradually get wider at the bottom.
1:57Guitar necks are always thinner at the top than the bottom.
2:00Now draw on the headstock.
2:02There are so many headstock shapes so go with whatever you like.
2:05This one is pretty simple.
2:06Cut that final shape out.
2:10Lightly sand it.
2:11Position it on the body right above the soundhole.
2:14Mark where the body ends.
2:17Thin that part of the neck out just a little bit.
2:19It’ll make the finished guitar look that much better when the 2 pieces fit together perfectly.
2:24Now throw that piece into the boiling water
2:26and grab out one of those coffee stirrers we put in before.
2:29It should bend and curve nicely without snapping.
2:31Put the 2 body pieces together.
2:33Wrap the coffee stirrer around the body pieces and use rubberbands
2:36to secure the coffee stirrer in place.
2:40Add as many rubberbands as it takes to really tighten it.
2:43Once that’s dry, the coffee stirrer will keep the curved shape.
2:48How cool is that?
2:49Glue it to the front body piece.
2:53Cut off any excess.
2:56Alright, let’s grab that headstock out of the boiling water.
2:58We need to bend the head back a little bit.
3:01I place it on the edge of my desk and gently push it back.
3:04This is what it looks like when it dries.
3:07At this point I decided that I didn’t like the curved bottom so I cut it into a straight
3:10edge instead. Totally optional.
3:13Then I draw a bunch of lines down the neck for the guitar frets. I drew about 20-25 lines
3:17gradually spacing them closer as I get to the bottom.
3:21With my X-acto knife, I carve out each of those lines.
3:23We’re going to put in real metal frets…bc we’re crazy…
3:26But first, let’s stain the fretboard. I use a mixture of dark brown and black to create
3:31a dark gray-ish brown.. Mix in a bit of water so it becomes a stain.
3:39For the frets, I’m using some super thin wire.
3:41This is 28 gauge jewelry wire.
3:43With some metal shears, I snip off a bunch of little pieces.
3:47Then with some superglue, glue each wire piece into the little slots.
3:56With a tiny handdrill, I make some shallow holes into the frets.
3:59I do it on frets 3,5,7,9,12, and so on.
4:04This is a good time to reference a picture of real guitar on Google
4:07Then I add some white paint into those holes.
4:10Trim off the excess wire and add some varnish for a glossy look.
4:15Yup that’s 3 headstocks! We’re making 3 mini guitars.
4:18The design on the first one will be very simple.
4:20I use a brown micro-tipped pen to draw a circle around the soundhole.
4:24The second one will be a lot more interesting.
4:26I’m making a sunburst design on this one so we’ll need black red and yellow paint.
4:30With a makeup sponge, I’m going to dab these colors on.
4:32I tear off a piece of the sponge and dab yellow all over the front of the body.
4:37Then I mix some that yellow with some red
4:39and add that orange hue everywhere except the center.
4:42Gradually use less yellow and more red so the colors
4:44get darker as you move outward.
4:48Then sponge on some black around the perimeter and on the sides.
4:58Add some varnish to seal in the color.
5:02I made the 3rd guitar super simple again with just the circle around the soundhole.
5:06Next, let’s make the bridge of the guitar where the strings will come out of the body.
5:10I just take a coffee stirrer and draw a line at the half inch mark.
5:13Then cut off 2 of the corners.
5:18Stain it the same color as the guitar neck.
5:22Look, I also made a wooden ring out of the coffee stirrers.
5:24These things are so versatile.
5:27Okay, back to our project.
5:29Glue on the bridge about half an inch under the soundhole with some woodglue.
5:36While that is drying, let’s glue on the necks as well.
5:39Also just using some woodglue here.
5:44Next, I use that mini hand drill again to drill 6 holes on the bridge. It’s just a
5:48simple row of 6 holes that go through the wood. We’ll be threading our string through
5:52these holes.
5:53I cut out a super thin piece from a coffee stirrer to add to the bridge. It will lift
5:58the strings up higher and it will also help guide the strings into their proper positions.
6:02I do the same for the top of the gutar neck.
6:04Cut some grooves into these pieces so the strings can slip into them perfectly.
6:09These cuts are a bit hard to see, but believe me…they’re there.
6:12Okay, time for the strings. I just use some regular white sewing thread but you could
6:16also use wire, fishing line…really anything. Cut out 6 lengths of thread. These are about
6:205-6 inches in length but it doesn’t matter too much. Make them longer than you think
6:25you need. You can always trim off the excess.
6:28Using a tweezer, I slip each thread into a hole.
6:33Once all 6 are in, I turn the guitar over and tie a knot to secure all 6 strings together.
6:37This will keep them all in place.
6:41See? Tugging on them won’t pull them out. Now you can glue the back piece of the body on.
6:50I like how the white thread really stands out against the dark neck but you can also
6:53paint the thread metallic silver for a more realistic look.
6:57Here’s how the silver strings would look.
7:01For some extra support on the guitar neck, I get a quarter inch dowel and line it up
7:04against the back of the neck. Mark the length of the body and cut that piece out with a
7:08miter saw. Once you have that little piece, slice off one side. This flat side is where
7:13we will glue it to the body.
7:16Just use wood glue for this.
7:19Draw a small downward curve on the top of this piece to create a gradual downward slope.
7:24Then carefully cut that piece out.
7:26Looks pretty good to me.
7:27Alright let’s add some interesting color to these boring bare wood guitars. I’m going
7:31to create a cherry stain by mixing some dark brown with red.
7:35Paint it onto the sides and back of the guitar.
7:38Add layers until you achieve your desired color.
7:41While that dries, let’s make the tuners and pegs for the head. Mark 6 holes in 2 columns of 3
7:46Drill those out with the tiny handrill.
7:49You can see I added the cherry stain to the head here too.
7:52Then I get some 20 gauge wire and cut out 6 half inch pieces.
7:57Stick them right into the holes.
8:02To secure them in place, I add some superglue to the back.
8:06Let’s string this baby up. For symmetry, I first pull the 2 middle strings up to the neck
8:11Wrap them around each of the top pegs.
8:13Add some superglue so the strings don’t unravel. Trim off any excess string.
8:18Then grab the next closest string and wrap them on the lower pegs.
8:22Make sure all the strings come out from the center and outward towards the pegs.
8:26Do this until all 6 strings are done.
8:30For a finishing touch to the pegs, I add a drop of silver paint to the top of each peg.
8:34You can do this at the end but I decided to varnish the rest of the body since the cherry
8:37paint was dry.
8:38Alright, back to the headstock. To make the tuners, I’m going to use some toothpicks.
8:42These have a small carved design on one end. I’ll be using 3 toothpicks per guitar.
8:47Cut off a 1/8 inch piece from the end of with the design.
8:50Split that little piece in half to create 2 tuners.
8:53Use superglue to attach them to the sides of the headstock. Line them up against the pegs
8:57Here, I’m adding some extra superglue just for strength.
9:01Then I paint them silver with some metallic silver acrylic paint.
9:04Looking great so far. Let’s finish this up.
9:08For the pickguard, Draw a half inch by ¾ inch rectangle.
9:11Then draw a teardrop shape inside that rectangle. Add a curve on the top left part of the teardrop.
9:16This yellow section will be the pickguard.
9:18With some clear plastic packaging, I trace the shape of the pickguard.
9:21Cut that out.
9:24To keep this in place while I’m painting it, I stick it on the sticky side of masking tape
9:28I’m going to paint this with nail polish, but you can also use acrylic paint.
9:31You can use any color you like but I’m going to mix some black with burgundy.
9:34I first lay down a layer of black nail polish, then add on dots of black and red.
9:39Then swirl them together with a dotting tool.
9:41You can also add some clear top coat to seal it all in.
9:44Once that’s dry, attach it to the body of the guitar with some superglue.
9:48Okay last detail- I just add a line of white paint across the top of the head.
9:52Not necessary but I really like that extra detail.
9:54That’s it guys! The guitars are all finished. They’re so tiny and adorable! I hope you


